Kathleen, of
Murgatroyd and Bean, introduced my embroidery friends,
The Wednesday Group, to the delights of making little
birds on our summer gathering at the
Blue Ginger summerhouse. We had a couple of patterns drawn on tracing paper, which we used to start with. I had bought some wire from a hobby store, and also brought some galvanised garden wire left over from making supports for raspberry canes and a wall trained fig tree. I had also brought some of my jewellery tools, pliers of various shapes and wire snips, and safety glasses, so that we could make wire legs if wanted.
 |
| first bird, silk scraps |
I had tried various patterns for birds ahead of this session, and had come to the conclusion that stitching little birds where seams were on the outside would be quicker and easier, especially when finishing off the bird after stuffing. To make it easier to add wire legs it is better to make a two part belly, so that you can stitch from beak to middle and tail to middle, insert the legs and then close this final seam. You can either do this with the frayed edges out like the rest or tuck them in to give a smooth belly.
 |
| bird with tuft of merino wool for tail, hand-dyed silk and velvet |
I made a lot of legs; I discovered I really enjoyed the process. The fine copper and gold coloured wires I bought from the craft shop turned out to be easy to work but a bit too soft for good stability of the bird. Birds made with this wire were better wired to a block of wood - I had some little legs left over from bookcases that had come with a hole drilled, so we just wired the legs on - it was a bit clumsy but worked as a first attempt. Wiring the bird to something also allows you to perch the bird on one leg or in a non-upright position, so you may wish to do this even if your bird is very stable.
made from a silk tie I had painted
Working with wire is much easier if you have the right tools. As a minimum you need wire snips and small pliers to allow you to bend the wire precisely. It would also be good to wear safety glasses when cutting the wire.
 |
| legs and body to scale, size for birds if printed as A4 sheet |
Bird:
Cut the pieces of fabric to form the bird. Chose patterns that you like for each piece, but remember that the two sides need to have the pattern facing opposite ways.
If you want to stitch any patterns on the bird before assembly do it now. Both types of embelishment can look very good; do whichever you want.
Stitch the head onto the two side pieces, starting from the beak each time. If you don't return to the beak each time you will get a twist in the pattern, much like if you fit a zip by starting at the top of the fly and simply running down and then back up the zip.
Stitch the front belly on, stopping with a gap before the point you want to insert the legs. You can change the way the bird stands by changing where the legs are inserted.
Stitch the second belly piece on, starting from the tail. If you want a tail piece you can stitch it into place before joining this seam, or add it afterwards. Which you choose to do will depend on the nature of the material you want to add. The birds with merino wool scraps as tails had these sewn into place before I closed this seam. I have made all the birds shown here by having only one belly piece and stitching the second half of the belly piece after the legs are fitted, but it is quite awkward and the other stitchers in the group were not happy with the quality of the seams they could get with this process.
Stuff the head and the tail of the bird. I used synthetic wadding bought from a sewing shop. Use whatever suits you and the type of bird you want to make. Wrap some stuffing around the legs, tieing on with some thread or fine wire. This ensures the wire ends won't poke through and adds stability. Insert into the bird, making sure stuffing goes all round the leg device.
Stitch the remaining side seams if any, and stitch the front and rear belly together.
Adjust the legs and feet to give a stable position that you like. Stitch on eyes.
You can wrap the legs with florist tape if you don't want to see the wire. I could only find green - brown would have been better. Many colours are available on the internet. You could also use threads or fine cloth, but you would then have to stitch or glue the ends in place.
Legs
 |
| wire legs - 5cm long |
Cut 55cm of wire (longer for taller birds)
Mark the midpoint of the wire with a bend. Start making the foot about 5cm from this point
Bend the wire at right angles to begin forming the big toe. I make the toes between 1 cm and 1.5cms long - bend again to make the toe flat to the ground. Go past the leg the same distance and form the middle front toe. Make one outside toe, curve the wire behind the leg and around to the other side of the foot to make the final toe. Complete the final toe and wind the wire around the leg and up to the middle.
Repeat on the second side.
If you have floppier wire you may need to wind the wire around itself more to give stability. You can always reinforce the legs with another piece of wire if need be.
You will have some spare wire in the middle. I make two curly loops to make sure the birds sit neatly and sturdily on the legs. You can uncurl these loops later to make the bird take a different shape or to form a beak if you want. This spare wire also means you don't have to worry if you make the feeet a bit bigger
The legs look like little creatures as they are, the top curly bits giving them lots of character.
These little birds are full of charm and character, and a great way to use up small scraps of fabric.
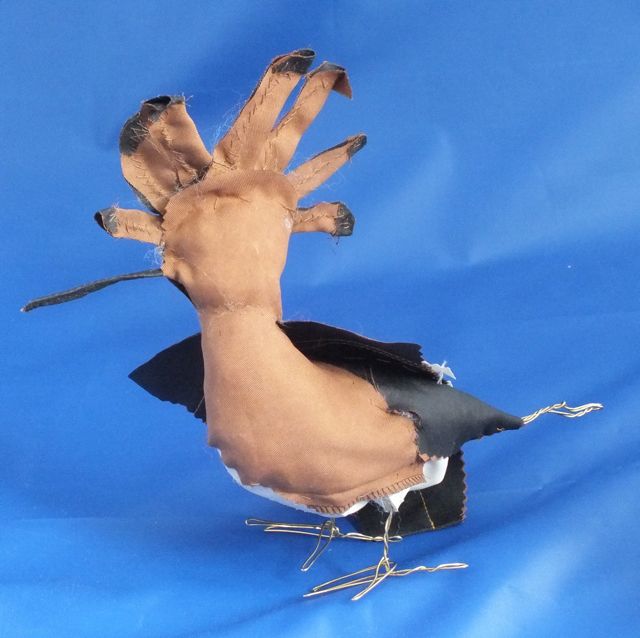
Once you have made a few birds you might want to experiment with scale and shape. I made a large bird with a wired beak - I shaped the beak and attached this to the large legs before beginning to stitch stuffing and fabric on in an emergent ( don't know what you are doing in advance) mode. This was an interesting process as the bird went through many shapes and colours before I ended up with this mad-looking quasi-cockerel. I had originally envisaged a large rook type bird with a big beak. This bird is about 20cm tall, made from cotton I had dyed in a summer school a few years ago and scraps of silk from
Sue Elliot.
Another bird made - with an owl in mind, had to acquire a stiff tail that reached the ground to allow it to stand steadily. Apparantly some birds do use their tails to give themselves stability, so it isn't such a strange notion.
I made another free-form bird and took photographs of the process. This will be a blog on its own as otherwise this introductory blog will be immensely long.
A few birds from the rest of the group:
 |
| Katie's glamorous tweed and silk bird |
Katie writes as
Textile Treasure Seeker
Annie made this little bird from calico and denim scraps, including using the seams to form a curly tail. Annie writes often on our group blog.