Showing posts with label embroidery. Show all posts

Sunday, 5 August 2012

Stained glass - getting ready

I am about to do something I always thought foolish in others.  I am going to go on a short course hoping to leave it with an object I want to keep.  Normally I arrive and try all the techniques rapidly, aiming to get an understanding of the principles of any craft.  Making stuff comes afterwards, when you understand the limitations and possibilities and have time to think about how desire and skill can interact to produce an outcome.

I have booked on a two day stained glass course in the Malvern SWORCS summer school.  I have wanted to try stained glass for ages, just being put off by the need for the wrists to work adequately to cut the glass.  I am hoping that, with the aid of a wrist brace, good tools, and some help, I will be able to do enough to enjoy the session.

I have a need for a stained glass piece.  Our living room is overlooked by a balcony, and it would be useful to keep something on the window sill that blocked this view without blocking our view or the light.  I have a pot of snapdragons I got from the farm shop yesterday in that position - it gives colour and shape but isn't too intrusive.

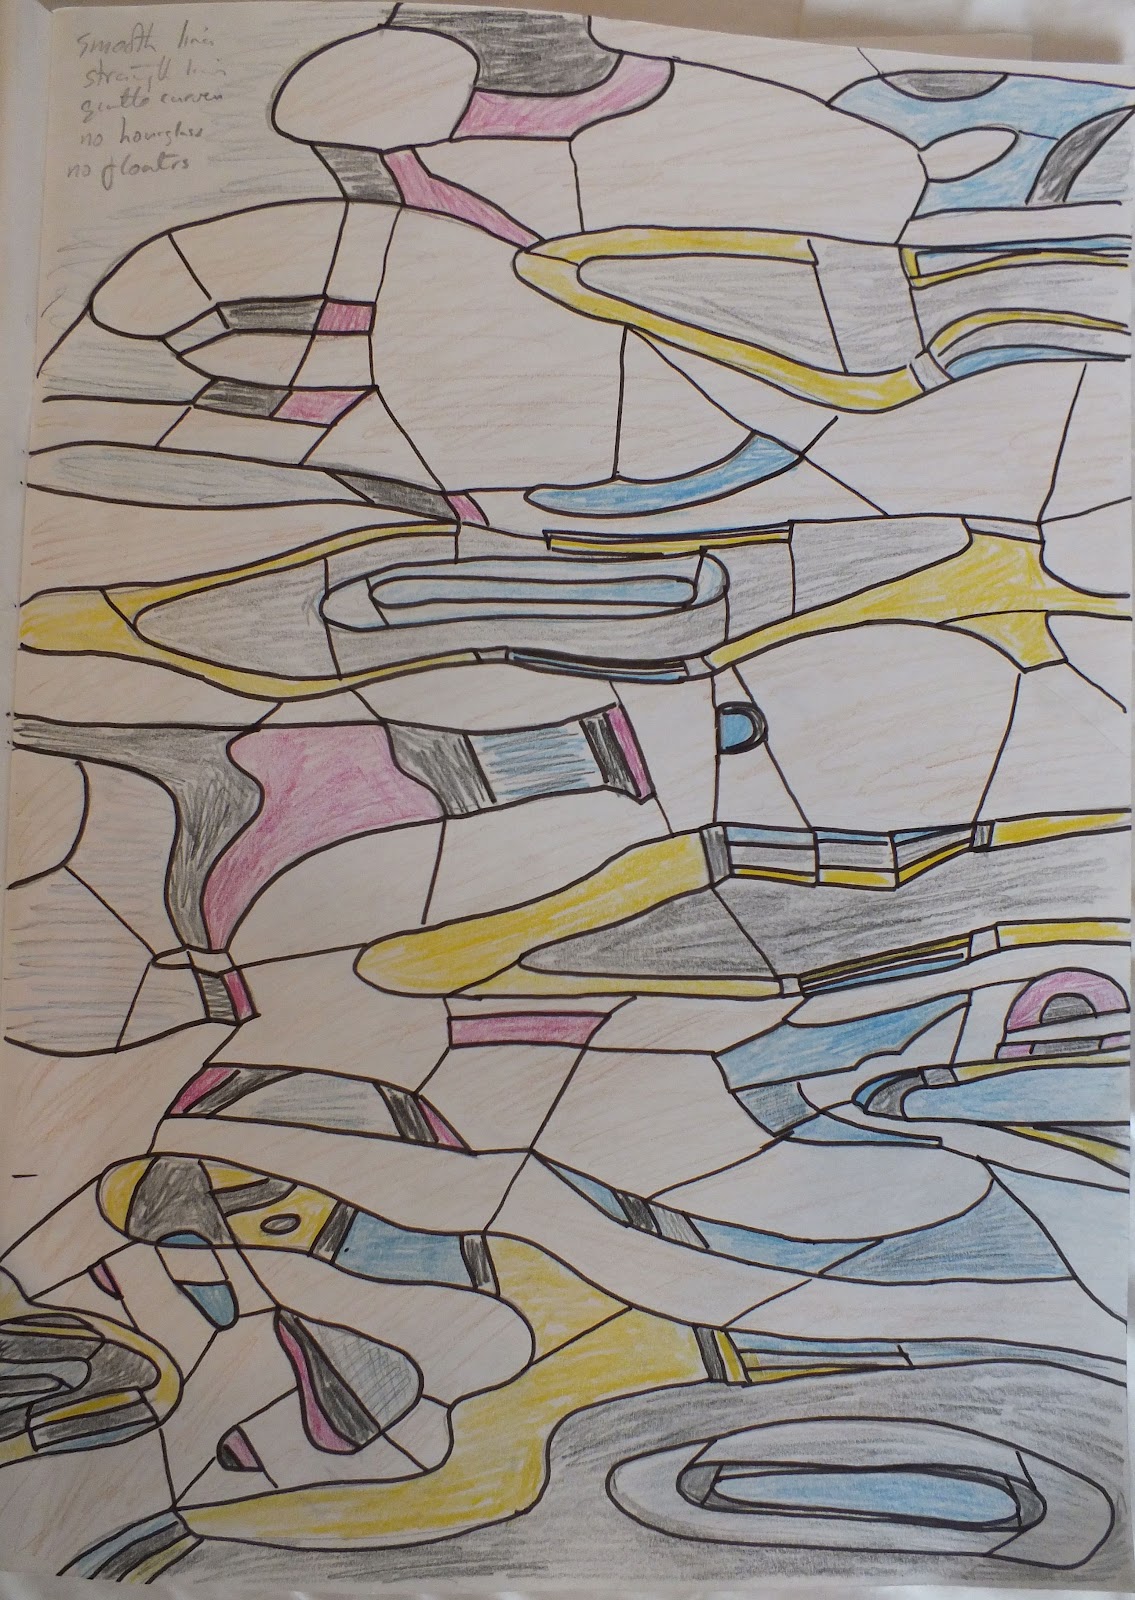
So, planning ahead.  Looking at the kind of stained glass pieces one can buy at craft markets I suspect my aspirations will be too high - I don't want a tile shaped piece made of three blobs of colour.  I'd like to have a piece at least 30cm high, and something I am happy to look at everyday.  I have been looking at the photos I took of reflections and ripples in the canal basin in the spring, and have been working on designs based on this.

There is a form of quilting called stained glass, where you lay fabric pieces on a background and stitch in place using black bias binding.  Each piece has to connect to the others.  I thought if I rustled up a quick one of these I would get some ideas for the glass piece.

I started with this photo:


I then drew a sketch and coloured it in with pencil crayons.  I liked the shapes but thought that the intricacy and number of shapes would make the project impossible.  I simplified it and coloured in with felt pens.  Some of the plain pieces I lightly stippled - imagining textured rather than coloured glass. Frank Lloyd Wright used stained glass pieces where a lot of the glass was clear so that the view wasn't obscured, and I am aiming at something like that.


I started cutting little bits of bright fabric out of the old hand-painted ties I have, but the silk was too slippery and hard to control.  I switched to some cotton sheeting I dyed a few years ago.  This seemed appropriate for the colours.  The rather livid colours I had available needed a foil, and I found a small piece of what looked like black hand dyed fabric at my local sewing store, and a mottled pale blue for the background.  I used some fine wrapping paper to take an outline and used this to cut out the shapes in the fabric.  I didn't pin or tack, so  a loss of precision occurred at this step.

I should have course have been more careful.   I should have ironed the fabric first.  I should have numbered the pieces, or at least laid them out one by one on the drawing so I knew where they went.  I piled them onto the drawing, but having to tidy things away in the middle meant that I ended up not being too sure where all the little bits belonged.  I used the drawing to position the larger pieces,and then placed the others where they seemed appropriate, and to fill large gaps.  At this point I lost sight of the fact that these colours were part of a real scene, and each piece should have been connected back to a real object.


I started stitching these bits together, just layering the slips of colour on the blue fabric.  After a while it started bunching so I cut out a piece of thick felt ( some fabric they use for making tennis balls, got from the artist scrap store during Wimbledon) and this made the fabric easier to manage. I stitched pieces on, I stitched between pieces, imagining they were pieces of glass that had to be held together.  I forgot about the image, and lost the vertical and horizontal nature of ripples and reflections.


I don't think much of this piece.  It is rough, flawed, and doesn't look very interesting.  It has lost the ripple effect because I thought of the black lines purely as holding lines and not as image.

This little project has made me think a lot about how the line, colour and space need to be managed in stained glass. Rather than thinking of colour first I need to think of line and then infill with colour as needed.  From that respect it was a very useful thing to do.

Friday, 20 July 2012

Scrapdragons


I made a lot of wire legs for the little birds we started making at our summer retreat (aka play session) at Blue Ginger.   I made them with the spare wire curled up at the top - useful if you want to make a beak or tail or just to add stability to the stuffed bird.  After a day spent trying to learn how to make a badge like Kathleen's my fingers wanted to do what they wanted to do....so a small creature evolved on the legs.  I like to build these little beasts from the inside out and let the materials decide what they want to become.

badge for Joy, my heroic little sister
I unfurled the little loops at the top and stitched wings on.  I used small scraps of an odd slightly translucent crepe fabric which arrives in my scrapbox backed onto heavy satin - part of my treasures supplied by Sue Elliot.  These little scraps had lovely swoopy edges so I used a piece for each wing and didn't cut them to shape at all.  It means the wings are very different in shape but the same texture.


I stitched a little wadding to the body and then tugged a piece of vari-coloured velvet in place.  Eyes were added - brown buttons I got from a treasure trove of materials donated by a fellow embroider to the group when we were at Blue Ginger.

The legs are made from a wire that is moderately easy to work with but it is too springy and won't move into new shapes as easily as I would like.  Getting all the toes to hit the ground is very hard, so I think a different kind of wire will need to be found once this lot is used up.


Thursday, 28 June 2012

Free-form fabric bird


I made several birds using a pattern.  I also enjoyed making two much larger birds working direct with the wire and stuffing and fabric, and building them up as I went.  This little bird follows the same process.


I started with a set of ordinary legs I had made from galvanised wire earlier.  Instructions for these are in the previous blog, though these were double the size of the ones described.  I unwound one of the curly bits in the middle and used this to form a beak.

I covered this with fabric and stitched it in place.


I then stitched some stuffing to the wire to form a head.


 I then sewed bits of fabric on.  I particularly liked this handmade silk and merino felt with the lime green strands,  I only had a piece about an inch on the largest dimension, so it just formed the front of the face.


I then added other head bits and began to build up the body, first with stuffing and then with pieces of fabric.

I added a tail and some wings. I liked this scrap of velvet with its fluffy edge, so the bird got a crest.


I used this rather livid yellow thread to pick up the threads on the front of the face.


Beads for eyes.  Are they big enough?  I could always change them later.

Named the bird Aubrey because of the autumnal auburn colours.

These beautiful scraps of silk and velvet were donated by Sue Elliot, who makes glorious items in her studio in Selkirk, Scotland.

Wednesday, 27 June 2012

Fabric birds - wonderfully whimsical


Kathleen, of Murgatroyd and Bean, introduced my embroidery friends, The Wednesday Group, to the delights of making little birds on our summer gathering at the Blue Ginger summerhouse.  We had a couple of patterns drawn on tracing paper, which we used to start with.  I had bought some wire from a hobby store, and also brought some galvanised garden wire left over from making supports for raspberry canes and a wall trained fig tree. I had also brought some of my jewellery tools, pliers of various shapes and wire snips, and safety glasses, so that we could make wire legs if wanted.  

first bird, silk scraps
I had tried various patterns for birds ahead of this session, and had come to the conclusion that stitching little birds where seams were on the outside would be quicker and easier, especially when finishing off the bird after stuffing.  To make it easier to add wire legs it is better to make a two part belly, so that you can stitch from beak to middle and tail to middle, insert the legs and then close this final seam.  You can either do this with the frayed edges out like the rest or tuck them in to give a smooth belly.

bird with tuft of merino wool for tail, hand-dyed silk and velvet
I made a lot of legs; I discovered I really enjoyed the process.  The fine copper and gold coloured wires I bought from the craft shop turned out to be easy to work but a bit too soft for good stability of the bird.  Birds made with this wire were better wired to a block of wood - I had some little legs left over from bookcases that had come with a hole drilled, so we just wired the legs on - it was a bit clumsy but worked as a first attempt.  Wiring the bird to something also allows you to perch the bird on one leg or in a non-upright position, so you may wish to do this even if your bird is very stable.


made from a silk tie I had painted


Working with wire is much easier if you have the right tools.  As a minimum you need wire snips and small pliers to allow you to bend the wire precisely. It would also be good to wear safety glasses when cutting the wire.

legs and body to scale, size for birds if printed as A4 sheet


Bird:

Cut the pieces of fabric to form the bird.  Chose patterns that you like for each piece, but remember that the two sides need to have the pattern facing opposite ways.  

If you want to stitch any patterns on the bird before assembly do it now.  Both types of embelishment can look very good; do whichever you want.

Stitch the head onto the two side pieces, starting from the beak each time.  If you don't return to the beak each time you will get a twist in the pattern, much like if you fit a zip by starting at the top of the fly and simply running down and then back up the zip.

Stitch the front belly on, stopping with a gap before the point you want to insert the legs.  You can change the way the bird stands by changing where the legs are inserted.  

Stitch the second belly piece on, starting from the tail. If you want a tail piece you can stitch it into place before joining this seam, or add it afterwards.  Which you choose to do will depend on the nature of the material you want to add.  The birds with merino wool scraps as tails had these sewn into place before I closed this seam. I have made all the birds shown here by having only one belly piece and stitching the second half of the belly piece after the legs are fitted, but it is quite awkward and the other stitchers in the group were not happy with the quality of the seams they could get with this process.

Stuff the head and the tail of the bird. I used synthetic wadding bought from a sewing shop.  Use whatever suits you and the type of bird you want to make. Wrap some stuffing around the legs, tieing on with some thread or fine wire. This ensures the wire ends won't poke through and adds stability. Insert into the bird, making sure stuffing goes all round the leg device.

Stitch the remaining side seams if any, and stitch the front and rear belly together.

Adjust the legs and feet to give a stable position that you like.  Stitch on eyes. 

You can wrap the legs with florist tape if you don't want to see the wire. I could only find green - brown would have been better.  Many colours are available on the internet.  You could also use threads or fine cloth, but you would then have to stitch or glue the ends in place.

Legs


wire legs - 5cm long

Cut 55cm of wire (longer for taller birds)

Mark the midpoint of the wire with a bend.  Start making the foot about 5cm from this point
Bend the wire at right angles to begin forming the big toe.  I make the toes between 1 cm and 1.5cms long - bend again to make the toe flat to the ground.  Go past the leg the same distance and form the middle front toe. Make one outside toe, curve the wire behind the leg and around to the other side of the foot to make the final toe.  Complete the final toe and wind the wire around the leg and up to the middle.  
Repeat on the second side.

If you have floppier wire you may need to wind the wire around itself more to give stability.  You can always reinforce the legs with another piece of wire if need be.


You will have some spare wire in the middle.  I make two curly loops to make sure the birds sit neatly and sturdily on the legs.  You can uncurl these loops later to make the bird take a different shape or to form a beak if you want.  This spare wire also means you don't have to worry if you make the feeet a bit bigger

 The legs look like little creatures as they are, the top curly bits giving them lots of character.


 These little birds are full of charm and character, and a great way to use up small scraps of fabric.


Once you have made a few birds you might want to experiment with scale and shape.  I made a large bird with a wired beak - I shaped the beak and attached this to the large legs before beginning to stitch stuffing and fabric on in an emergent ( don't know what you are doing in advance) mode.  This was an interesting process as the bird went through many shapes and colours before I ended up with this mad-looking quasi-cockerel.  I had originally envisaged a large rook type bird with a big beak.  This bird is about 20cm tall, made from cotton I had dyed in a summer school a few years ago and scraps of silk from Sue Elliot.


Another bird made - with an owl in mind, had to acquire a stiff tail that reached the ground to allow it to stand steadily.  Apparantly some birds do use their tails to give themselves stability, so it isn't such a strange notion.


I made another free-form bird and took photographs of the process.  This will be a blog on its own as otherwise this introductory blog will be immensely long.

A few birds from the rest of the group:
Katie's glamorous tweed and silk bird
Katie writes as Textile Treasure Seeker


Annie made this little bird from calico and denim scraps, including using the seams to form a curly tail.  Annie writes often on our group blog.

Thursday, 16 February 2012

a new adventure

It has been a long time since I did anything much with textiles.  I have been engrossed in the process of moving house for months, and seem to have done little else except prepare for the move, move, and now I am trying to get the new flat to function well.

I now want to make two textile pieces for the flat.  I am aiming to make things which are attractive to look at as well as interesting to make.  Those of you who know my work might find that surprising.  I have always been entranced by the search for meaning and interesting process in creation, being less concerned as to whether things look good.

One piece is for the living room, where we have a blank wall opposite a wall of storage and over the sofa.  I would like to pick up on the themes of river and canal as we on a thrust of land with the river Severn in front of us and a major canal junction (just out of sight) to our left.  I may also add the sea, as that is where I would rather be living.

The second piece is for the long drop above the staircase.  We have a flat (apartment) all on one level except for these stairs to the roof terrace.  The space is about fifteen feet (Rod's guess) and only the width of the stairs.  Getting any thing up to that space will be tricky, so it needs to be something that we are happy with not changing, though it wont be visible during normal walking around.  I am soon to go on a trip around France and Italy in the campervan.  I expect to use inspiration from this trip for the long piece.

I was struggling to think how to begin - remember, I am being stymied by the idea of aesthetics driving the quest rather than a bizarre idea.  During discussion with my embroidery group, which meets once a month, Anni suggested that I blog the process rather than attempt a paper sketchbook.  She had been showing us a very inspiring sketch book - and they all recollected that on my C&G course I tended to work first and produce the paperwork to justify the outcome afterwards.

So, the beginning.  I have been looking at some old Embroidery magazines that Katie was giving away, looking at the scenery, looking at the amazing quilts of watery scenes that Pauline Burbidge produces (she has a lovely studio quite near that of my sister, Joy Parker).  I am keen to get started.  One more level of sorting the flat - the shelves for my craft and art materials and the Horn sewing machine table, and I'll get started in earnest.

I picked up some seed pods and a wisp of luminous white bark from a silver birch on a walk today.  Maybe they will feature somewhere in the work.  I'm going to use photos and sketches to explore the colours and shapes I want to include in these pieces - though of course there is always a giant gap between aspiration and inspiration and the final capacity to make.  I only managed to read a few pages of Virginia Woolfe's To the Lighthouse, but she describes the way you look at something, you know how you want to paint it, and it vanishes between the knowing and the painting.

Tuesday, 5 July 2011

Resolutions


Another catch-up postcard


Monday, 4 July 2011

Georgia falling and the ginger pig


Following on from the entertainments of the summer residency at Blue Ginger, I have made two embroidered postcards.  The sewing machine was a bit stroppy, but manged to complete both without tearing my hair out.

I had hoped to catch up on all the missed postcards before the September Exhibition.  However, the topics from last year aren't on the Facebook list any more...but there was a title of 'something beginning with F'.  While I was looking for a photo for the 'Stitch in Time' topic, I came across a photo of my granddaughter as a baby, caught in the act of falling (she was at that stage where sitting up is a great effort - but the floor is very close), with her hair flying out like thistledown. So, Falling (Georgia) is my submission for this topic.


When we are the Blue Ginger Summer House artist's residency there was a hole in the grass that two of us got caught out by.  On the Thursday I put a squeaky toy in the hole, to mark where it was and act as warning.


Of course, no-one could resist standing on it and making it squeal.  As it contributed so much entertainment I thought an embroidery of a pig would be appropriate.


Friday, 17 June 2011

Pianola roll - opportunity and threat

donkey sand-automata - it did have a keyboard

I went to the World of Mechanical Music  in Northleach, a village in the Cotswolds.  This is a completely amazing little place full of the most astonishing mechanical music machines.  A tour involves being played ( and sometimes playing yourself) music on pretty well every form of machine for playing music that works by winding or pedaling.  My highlight was being played a direct paper recording by Rachmaninoff - sitting watching the keys of the piano move it felt like the man was sitting there playing with invisible and very large hands just for me.

This little museum is also a workshop for repairs, I think the back room probably has gnomes...probably a direct time-vortex link to the North Pole.  They also sell old unwanted pianola rolls for one pound each.  I came away with a handful, and gave them to my embroidery group in lieu of Christmas cards.  Since then, each month when we meet, we find out if anyone has started a work making use of the pianola roll, each time we ruefully shake our heads.
front edge of roll - attaches to winding mechanism

I intended to make an automaton of a piano player with the paper from my pianola roll.  Anyone who has seen any of my stitchery will know precision is not my strong point, but I love automata and had always wanted to make some.  I bought two paper automata kits so that I could learn how they worked.  One had a donkey that played a keyboard, operated by sand falling through a hopper.  I made it, rather roughly, but by now I have lost a few of the bits.  The second one is a set of fingers that move as you wind the handle. I had all sorts of plans but as the exhibition date looms I am reducing the scale of my aspirations.

Yesterday I finally unrolled my pianola roll and discovered it was about three times the length of my house!  After a bit of agonising I cut a section of paper out of the middle to have something to work with, to get the feel of how the paper works, can it take stitch, how does it fold.  I also tamped talcum powder through the holes with a cotton-wool pad onto dark soft paper, considering it's use as a stencil.
very very long!

Pianola rolls have holes that provide information.  These holes determine which keys are played.  In effect they are no different than a knitting pattern or a computer programme.  I looked at the holes, the added lines of colour whose purpose I don't know, and decided to start with a direct copy using cross stitch.  I have a piece of cream even-weave, some threads, and a piece of work that I can work on easily, a bit every day.
pianola roll detail


The rolls come in neat cardboard boxes with supports for the ends of the rolls. These are beautiful in themselves. The ends of the rolls area a variety of materials, but the Bakelite ones are, again, lovely things in their own right.  any aspect or part of these rolls could be the starting point for the work.

I was at Malvern Theatre last night, and noticed that they hang long banners from poles in their high ceiling.  Immediately I could see a piece of work with nine long embroidered and manipulated pieces of the piano roll.  Will I be brave enough to suggest this?  I'll work more on my roll - then perhaps after our September show in Ledbury suggest it to the group.

This is such a long (both in time and physicality) piece of work that I am going to use this blog as a sketchbook to describe the processes I go through, rather than waiting to write about a finished piece.  I am hoping this will help me clarify my ideas and remember what I have planned to do.

Saturday, 11 June 2011

A summer postcard


A group of friends from my C&G course still meet monthly.  We make a small postcard sized piece on a theme each month just to keep those of us less good at motivating ourselves working. I have to admit that, even with such a small piece and a deadline, I have still been poor at doing these.

However, next week we meet, and this month the theme is summer.  I have planned several different pieces in my head, but they got no further.  One of the group does a truly inspiring mini-sketchbook for each them.  We all sigh and say we must do the same and never do.  So, all these thoughts don't even make it to paper.

Yesterday I was hunting on the computer for a particular photo and came across one I took in Scarborough a few summers ago.  They have some lovely beach huts and two women had set up a table with bright cloth and a vase of flowers and were enjoying their tea in the sunshine.  I asked if I could take their picture, thinking it would a lovely source of information.


So, this little postcard is based on that idyllic hot summer moment.

I started by drawing the picture with felt pens.  I find drawing a scene helps me be sure of the spatial arrangement and points of interest.  I then found a scrap of artist canvas, found a new sewing machine needle (that took a hunt) and a wash-out fabric marking pen.  I was going to just do free drawing with the machine but it is so long since I have done any embroidery with the machine that I drew the rough sketch first.  I then stitched with black thread, washed the cloth and left it to dry.

I gave away vast amounts of fabric recently due to an impending house move, so have fewer pieces of cloth to chose from.  I thought the table cloth, vase and flower, and the beach hut doors should be fabric snippets, and the rest left as stitch. Fortunately the stack of fabric and sundries I was going to take to College is still here, and it includes a lot of ties I painted for Rod.  It occurred to me that if I just kept those I would have access to a lot of different colours in small amount, so this will be my source for small bits of cloth.

I added a bit of colour for some of the doors, the table cloth and the flower.  I did make an error on the blue and red door but I didn't spot that until I had sewed it up (they should be shorter) and I decided not to unpick the envelope to restitch it.  The reverse has a note from these two ladies to a friend - done as always too hastily.

Wednesday, 24 November 2010

all I want....

The Wednesday Group, my pals from the machine embroidery City & Guild's course at Malvern, are making a postcard sized work each month,  This month the topic is 'Christmas'.


It is a lovely frosty day outside, and a good day to start a new project.


I haven't sewn anything much for ages and so I wanted an easy project to start with.  I began with needing to find a long extension lead, as the whole electrical circuit in the room I sew in have stopped working.  We suspect that mice have chewed through a cable but we haven't yet figured out where.

I decided to take the 'All I want for Christmas is my two front teeth' song as my inspiration.  I considered which materials to use for each layer, but decided to try felt as I had sufficient and its lack of fraying was attractive.

I got together materials, then tried to thread my sewing machine.  After a few goes I triumphantly got the needle threaded, only to realise that I had threaded the bobbin thread through the eye of the needle.  Hey Ho...

I wrote the postcard to Santa saying what I wanted.  I had decided not to make any 'cutesy' spelling errors but spelled 'Dear' wrong without meaning to.  I had put out a note from a then six year old friend of mine to get the feeling of the writing, and it obviously worked.

I stitched ribbon to red felt for the wrapping, organised so that undoing the bow allowed access to the inside of the present.


The inside is lined with violet/blue velvet.  Sewn onto the velvet are two incisors, complete with root.  I made them out of white and flesh coloured ribbon.  I would have liked to make teeth that were more beautifully crafted, especially after seeing Annie's exquisite apples with pips last week, but couldn't manage that.  I think they do, at least, look like teeth enough for the story to work.  I had hoped they would seem like jewels set in a box.

So, not great, and I had to relearn things like changing machine feet and tensions and threads...but at least it is done.